Learning how to draw a zucchini is a fun and creative way to express your artistic skills. Whether you’re a beginner or an experienced artist, this step-by-step guide will help you capture the unique shape and texture of this versatile vegetable.
Start by sketching the basic outline of the zucchini, paying attention to its elongated shape and slightly tapered ends. Then, add the details such as the stem, the ridges on the surface, and any imperfections that make it look more realistic.
Next, use shading techniques to give your drawing depth and dimension. Add shadows and highlights to mimic the way light interacts with the zucchini’s surface. This will make your drawing appear more three-dimensional and lifelike.
Finally, feel free to add your own creative touches to make the zucchini drawing truly unique. You can experiment with different colors, backgrounds, or even incorporate other elements into your composition.
With practice and patience, you’ll be able to master the art of drawing zucchinis and create stunning illustrations that showcase your artistic talent. So grab your sketchbook and pencils, and let your imagination soar!

Preparing Your Drawing Materials: Essential tools and supplies for drawing a zucchini
Before starting your zucchini drawing, it is essential to prepare your drawing materials to ensure a smooth and successful artwork. Here are the essential tools and supplies you will need:
Drawing Paper:
Select a high-quality drawing paper that is suitable for your preferred drawing medium. For pencil or charcoal drawings, a medium-weight paper with a smooth surface is ideal. If you plan to use ink or markers, choose a heavier-weight paper that can withstand the ink without bleeding through.
Drawing Pencils:
A set of drawing pencils with varying degrees of hardness is crucial for creating different shades and textures in your zucchini drawing. Use softer pencils (2B or 4B) for darker areas and harder pencils (2H or 4H) for lighter areas and fine details.
Eraser:
An eraser is an essential tool for correcting mistakes and creating highlights in your zucchini drawing. Use a kneaded eraser for gentle, smudge-free erasing, or a soft vinyl eraser for more precise erasing.
Blending Stumps/Tortillions:
Blending stumps or tortillions are useful for blending and smudging graphite or charcoal to create smooth transitions and gradients in your zucchini drawing. They are especially effective for shading and creating a realistic texture.
Charcoal:
If you prefer to work with charcoal instead of pencils, make sure to include a range of charcoal sticks in different hardness levels. Charcoal is excellent for achieving deep, rich tones and creating expressive, textured effects.
Ink Pens/Markers:
If you plan to add ink or marker details to your zucchini drawing, choose pens or markers that are compatible with your paper and desired effect. Waterproof and archival ink pens or alcohol-based markers are ideal for achieving vibrant and long-lasting results.
Ruler:
A ruler is handy for creating straight lines and precise measurements in your zucchini drawing. It is particularly useful when drawing the zucchini’s stem or any other straight lines in your composition.
Reference Image:
Having a good reference image of a zucchini is crucial for accurately capturing its shape, texture, and details. Find a clear, high-resolution photograph or set up a still life arrangement to use as a reference while drawing.
Drawing Board:
Using a drawing board or a sturdy surface to support your drawing paper will help prevent it from shifting or warping during the drawing process. It provides a stable and comfortable drawing surface.
Now that you have gathered your essential drawing materials, you are ready to start drawing a zucchini! In the next section, we will guide you through the step-by-step process of creating a realistic zucchini drawing.

Step-by-Step Zucchini Drawing Tutorial: A detailed guide to creating a realistic zucchini artwork
If you’re a budding artist looking to improve your drawing skills or simply want to try your hand at creating a realistic zucchini artwork, you’ve come to the right place. In this step-by-step tutorial, we will guide you through the process of drawing a zucchini from start to finish. So grab your pencils, paper, and let’s get started!
Materials You Will Need:
Before we begin, make sure you have the following materials ready:
- Drawing paper
- Pencils (ranging from 2H to 6B)
- Eraser
- Blending stump or cotton swabs
- Reference photo of a zucchini
Step 1: Study the Reference Photo
Start by studying the reference photo of a zucchini. Observe its shape, texture, and details. Pay attention to the curves, bumps, and ridges on the zucchini’s surface. This will help you understand the structure of the zucchini and create a more realistic drawing.
Step 2: Sketch the Basic Shape
Using a light pencil, sketch the basic shape of the zucchini on your drawing paper. Start by drawing a simple oval shape to represent the body of the zucchini. Then, add a smaller oval at one end to represent the stem. Don’t worry about adding too much detail at this stage; focus on getting the proportions right.
Step 3: Define the Contours
Now, using a darker pencil, define the contours of the zucchini. Pay attention to the curves and bumps on its surface. Use light, curved strokes to create a sense of volume and form. Remember to keep the strokes in the direction of the zucchini’s shape.
Step 4: Add Texture and Details
Next, add texture and details to your zucchini drawing. Use a combination of light and dark pencil strokes to create the illusion of bumps and ridges on the zucchini’s surface. Pay attention to the areas where the light hits the zucchini and create highlights accordingly. Don’t forget to add the stem and any other details you observed in the reference photo.
Step 5: Shade and Blend
Now it’s time to add shading to your zucchini drawing. Start by identifying the areas of shadow and use a darker pencil to fill them in. Gradually build up the shading, using a range of pencils from 2H (light) to 6B (dark). Use your blending stump or cotton swabs to blend the shading and create a smooth transition between light and shadow.
Step 6: Refine and Finalize
Take a step back and assess your drawing. Look for any areas that need refinement or adjustment. Use an eraser to lighten any areas that are too dark or correct any mistakes. Add final details and touches to bring your zucchini artwork to life.
Step 7: Sign and Display
Congratulations! You have successfully completed your zucchini drawing. Sign your artwork and consider displaying it in a frame or sharing it with others. Don’t forget to take a moment to admire your hard work and the progress you’ve made in your drawing skills.
In summary, this step-by-step zucchini drawing tutorial has guided you through the process of creating a realistic zucchini artwork. By studying a reference photo, sketching the basic shape, defining contours, adding texture and details, shading and blending, refining, and finally signing and displaying your artwork, you have honed your drawing skills and created a beautiful zucchini drawing. Remember, practice makes perfect, so keep exploring different subjects and techniques to further enhance your artistic abilities.
Adding Depth and Texture: Techniques for capturing the distinctive features of a zucchini
Zucchini is a versatile and delicious vegetable that can be used in a variety of dishes. Its mild flavor and tender texture make it a favorite ingredient for both savory and sweet recipes. However, to truly elevate your zucchini dishes, it is important to capture the distinctive features of this vegetable by adding depth and texture to your preparations. In this section, we will explore some techniques to enhance the flavor, appearance, and overall appeal of zucchini.
1. Grilling
Grilling is a fantastic method to bring out the natural flavors of zucchini while adding a smoky and charred taste. Start by cutting the zucchini into thick slices or lengthwise strips. Brush them with olive oil, season with salt and pepper, and place them on a preheated grill. Cook for a few minutes on each side until they develop grill marks and become tender. The caramelization that occurs during grilling gives the zucchini a rich and complex flavor profile.
2. Roasting
Roasting zucchini is another technique that adds depth and texture to this vegetable. Preheat your oven to 400°F (200°C). Cut the zucchini into bite-sized pieces or wedges, toss them with olive oil, salt, and any desired herbs or spices. Place the seasoned zucchini on a baking sheet and roast for about 20-25 minutes or until they are golden brown and slightly crispy. Roasting intensifies the flavors of zucchini and creates a deliciously tender interior with a slightly crunchy exterior.
3. Sautéing
Sautéing zucchini is a quick and easy method that results in a soft and tender texture, perfect for incorporating into various dishes. Begin by slicing the zucchini into thin rounds or half-moons. Heat a skillet over medium-high heat and add a drizzle of olive oil. Once the oil is hot, add the zucchini slices and cook for about 4-5 minutes, stirring occasionally, until they are lightly browned and tender. Sautéing zucchini enhances its natural sweetness and provides a delicate texture that works well in stir-fries, pasta dishes, or as a standalone side dish.
4. Spiralizing
If you’re looking for a fun and creative way to add texture to your zucchini dishes, consider spiralizing. Using a spiralizer or a vegetable peeler, create long, thin strands of zucchini noodles. These noodles can be used as a substitute for traditional pasta or incorporated into salads and stir-fries. The spiralized zucchini adds a unique crunch and offers a visually appealing presentation to your dishes.
5. Stuffing
Zucchini’s shape and size make it an excellent candidate for stuffing. To prepare stuffed zucchini, cut the zucchini in half lengthwise and scoop out the seeds and pulp to create a hollow cavity. Fill the cavity with a flavorful mixture of your choice, such as seasoned ground meat, rice, cheese, or bread crumbs. Bake the stuffed zucchini in the oven until the filling is cooked and the zucchini is tender. This technique adds both depth and texture, as the zucchini becomes tender while the stuffing provides additional flavors and textures.
6. Pickling
Pickling zucchini is a wonderful way to preserve its unique flavor and enhance its texture. Begin by cutting the zucchini into thin slices or spears. In a saucepan, combine equal parts water and vinegar, along with salt, sugar, and any desired spices. Bring the mixture to a boil and simmer for a few minutes. Pour the hot brine over the zucchini slices in a jar, making sure they are fully submerged. Allow the pickles to cool to room temperature and then refrigerate for at least 24 hours before enjoying. Pickled zucchini adds a tangy, crispy element to sandwiches, salads, or charcuterie boards.
Summary
By implementing these techniques into your zucchini preparations, you can add depth and texture to fully capture the distinctive features of this versatile vegetable. Whether grilling, roasting, sautéing, spiralizing, stuffing, or pickling, each method brings out unique flavors and textures that will elevate your zucchini dishes to new heights. Experiment with these techniques and let your culinary creativity soar!
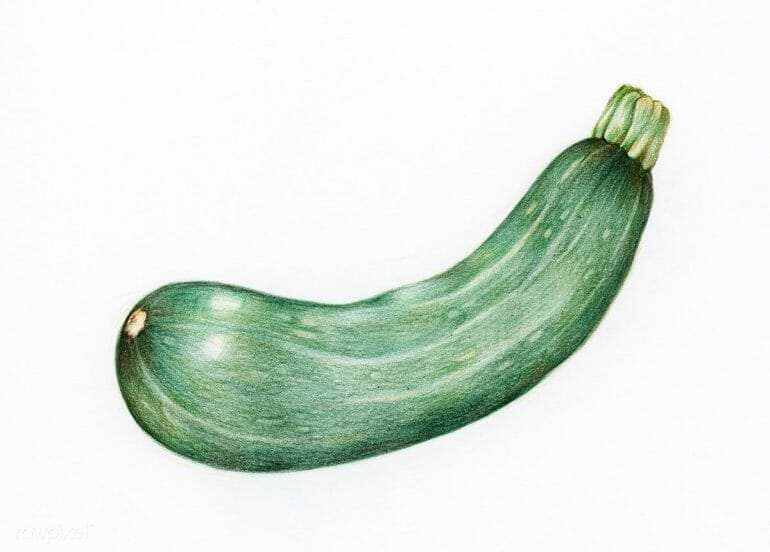
Enhancing Your Zucchini Drawing: Tips for shading, highlighting, and adding finishing touches to your artwork
Creating a realistic and visually appealing drawing requires more than just outlining the basic shapes. To bring your zucchini drawing to life, you need to master the art of shading, highlighting, and adding those essential finishing touches. In this section, we will explore some valuable tips and techniques that can take your artwork to the next level.
1. Understanding Light and Shadows
Before diving into shading, it’s crucial to understand how light interacts with objects. Observe your zucchini carefully and take note of the areas that receive direct light, as well as the shadows that are cast. This observation will help you determine where to apply shading and highlights in your drawing.
2. The Power of Shading
Shading is the key to adding depth and dimension to your zucchini drawing. Start by identifying the areas of your zucchini that are darker or in shadow. Use a darker shade of the zucchini’s color or a complementary color to gently shade these areas. Gradually build up the layers of shading to create a more realistic effect.
Consider the direction of the light source when shading. Highlights will be present on the opposite side of the zucchini, while shadows will appear on the side facing away from the light. Pay attention to the curves and contours of the zucchini, and adjust your shading accordingly to capture its form accurately.
3. Perfecting Highlights
Highlights add that touch of realism to your zucchini drawing, mimicking the way light reflects off its surface. Using an eraser or a white colored pencil, carefully remove or lighten the areas where the light hits the zucchini directly. This will create a bright, shiny effect that enhances the three-dimensional appearance of your artwork.
4. Adding Texture
Zucchinis have a unique texture with bumps and ridges that can add interest and realism to your drawing. To capture this texture, use a combination of short, quick strokes and cross-hatching techniques. Vary the pressure and direction of your strokes to create the desired effect. Spend some time observing the zucchini’s surface and try to replicate its texture as closely as possible.
5. Finishing Touches
Once you are satisfied with the shading, highlighting, and texture, it’s time to add those final details that bring your zucchini drawing to life. Pay attention to smaller features such as the stem, leaves, and any imperfections on the zucchini’s surface. Use fine lines or subtle shading to capture these details.
Don’t forget to step back from your artwork occasionally to assess the overall composition. This will help you identify any areas that may need further refinement or adjustment.
Summary
Mastering shading, highlighting, and adding finishing touches to your zucchini drawing can make a significant difference in the final result. By understanding light and shadows, applying careful shading techniques, perfecting highlights, adding texture, and giving attention to the finer details, you can create a realistic and captivating artwork that truly showcases the beauty of a zucchini.
FAQs
1. How do I draw a zucchini?
To draw a zucchini, start by sketching a cylindrical shape for the body. Add a smaller, round shape at one end for the stem. Next, draw a series of curved lines along the body to represent the ridges. Finally, add details like the leaves and any shading to give it depth and dimension.
2. What are some tips for drawing a realistic zucchini?
To make your zucchini drawing look more realistic, pay attention to the proportions and shape. Study reference images to see how the ridges and curves are formed. Use shading to add depth and highlight different areas. Don’t forget to add details like the stem and leaves to complete the drawing.
3. Can I use colored pencils or markers to enhance my zucchini drawing?
Absolutely! Colored pencils or markers can add vibrant colors to your zucchini drawing. Experiment with different shades of green and use light strokes to create a smooth texture. You can also blend colors to add depth and highlights. Consider using a reference image to accurately match the colors of a real zucchini.
Conclusion
In conclusion, learning how to draw a zucchini can be a fun and creative process. By following step-by-step instructions and practicing, anyone can develop their drawing skills and create realistic and visually appealing zucchini illustrations. Whether you are a beginner or an experienced artist, drawing vegetables like zucchinis can improve your overall drawing abilities and allow you to explore different techniques and styles. So grab a pencil, a piece of paper, and let your imagination run wild as you bring the humble zucchini to life on the page. Happy drawing!